|
|
|
How to Use IRC

 IRC, or Internet Relay Chat, is a decentralised chat protocol that has been an Old Internet staple since its invention back in 1988. IRC allows you to choose a moniker (changeable at any time) and have both group discussions in channels and private one-on-one conversations with specific people. Channels are prefixed with the number (#) character and followed by whatever name their founder chose (i.e., #comicchat, ##, or the bare minimum of #). There are services (essentially bots that handle administrative functions) present that allow you to register your nickname(s) and do other helpful tasks for you.
Although IRC was quite popular back in its glory days of 2003, usage has declined over the years due to the emergence of proprietary (and usually spyware-riddled) platforms such as Disc*rd, and as such, it is understandable that not everyone will be familiar with its usage. This page will ocver everything from setting up and connecting from an IRC client, to navigating IRC and using various useful commands.
A table of contents for the page is provided below. If you are completely new to IRC and do not have a client and/or do not know how to connect to an IRC network, you will want to go to the Setting Up an IRC Client section. If you need help with navigating IRC, using services, or more advanced tasks such as registering/maintaining a channel and setting custom modes, check out the latter sections.
Likely the most used client today is the GUI client HexChat, which can be downloaded here. If you are more technologically savvy and prefer running things in a terminal, your best bet will likely either be Irssi (my personal choice) or WeeChat. Other popular choices are Pidgin and of course, the one and only Microsoft Comic Chat, for when you want to chat on IRC as a cat, an anime woman, or any other silly character.
IRC, or Internet Relay Chat, is a decentralised chat protocol that has been an Old Internet staple since its invention back in 1988. IRC allows you to choose a moniker (changeable at any time) and have both group discussions in channels and private one-on-one conversations with specific people. Channels are prefixed with the number (#) character and followed by whatever name their founder chose (i.e., #comicchat, ##, or the bare minimum of #). There are services (essentially bots that handle administrative functions) present that allow you to register your nickname(s) and do other helpful tasks for you.
Although IRC was quite popular back in its glory days of 2003, usage has declined over the years due to the emergence of proprietary (and usually spyware-riddled) platforms such as Disc*rd, and as such, it is understandable that not everyone will be familiar with its usage. This page will ocver everything from setting up and connecting from an IRC client, to navigating IRC and using various useful commands.
A table of contents for the page is provided below. If you are completely new to IRC and do not have a client and/or do not know how to connect to an IRC network, you will want to go to the Setting Up an IRC Client section. If you need help with navigating IRC, using services, or more advanced tasks such as registering/maintaining a channel and setting custom modes, check out the latter sections.
Likely the most used client today is the GUI client HexChat, which can be downloaded here. If you are more technologically savvy and prefer running things in a terminal, your best bet will likely either be Irssi (my personal choice) or WeeChat. Other popular choices are Pidgin and of course, the one and only Microsoft Comic Chat, for when you want to chat on IRC as a cat, an anime woman, or any other silly character.
- Getting Started (HexChat) - You can download HexChat from the official website for Windows, or by downloading the "hexchat" package from the package manager your distro uses for Linux (i.e., "sudo apt install hexchat" on Debian).
Once you've installed and opened up HexChat, you need to manually add KoshkaIRC to the list of networks in order to connect. Click on "HexChat" on the top-leftmost corner, and then click on "Network List". Click "Add" and type in "KoshkaIRC" or whatever name you wish to assign. Then, with the network name selected, click on "Edit". Click where it says "newserver/6697" to edit it, and replace it with "irc.koshka.love/6697". Make sure "Use SSL for all the servers on this network" is checked off. You may have to also select "Accept invalid SSL certificates" if connecting does not work.
Since you cannot set the "real_name" field from the global user information setup, it is preferable to set up user information individually for each network you connect to. To do this, make sure "Use global user information" is unchecked, and enter your preferred nickname, "real name", and username (identd) in the fields immediately below that.
Once everything is set up as you like it, click on the "Close" button to return to the Network List, and click "Connect" to connect to KoshkaIRC. Once you're in, use the /join command (/join #, /join #speakez, /join #ktv) to join the main channels. You can also set HexChat to auto-join channels by adding them in the "Autojoin channels" tab in the network configuration you set up earlier.
Should you choose to use HexChat, please keep in mind that by default, the client leaks your operating system and CPU if someone sends you a CTCP VERSION request (which typically simply returns what IRC client you are utilising). You can disable the CTCP VERSION response altogether by using the following command: "/set irc_hide_version on".
- - You can download the "irssi" package from your package manager in Linux, or install it on Windows through Cygwin by installing the program and selecting Irssi in the Select Packages screen during the installation process.
Irssi is a terminal client so it may some time to get used to if you are used to using GUI clients, but you will soon find it to be very efficient and sleek. You can switch between windows by using "alt" and the left/right arrow keys to move back and forth (i.e., alt+right to go from window #3 to window #4 or alt+left to go from window #4 to window #3), "alt" and a number to go to a specific window (i.e., alt+3 to go to window #3, alt+q to go to window #11), or by entering the command /<NUM> (i.e., /77 to go to window #77) and pressing enter.
You can rearrange windows for easier access with the "/win num <NUM>" command or the "/win move left" or "/win move right" commands. For instance, you can swap window #77 with window #31 by entering the "/win num 31" command inside window #77, and you can swap window #77 with window #76 by entering the "/win move left" command inside window #77.
There are a number of settings in Irssi that you will want to change before you deploy it for the very first time. You can change your nickname and alternative nickname (in case the first is taken) with "/set nick <YOUR_NICK>" and "/set alternate_nick <ALTERNATE_NICK>", respectively. To set what information is shown in your identd and "real name" fields, use "/set user_name <YOURIDENTD>" and "/set real_name <"REAL NAME">", respectively.
Unlike most clients, Irssi does not keep logs by default, but you can set it to do so with the "/set autolog on" command. You also need to manually configure seconds to show up in timestamps both inside the client and IRC logs using the "/set timestamp_format" and "/set log_timestamp" commands (e.g., /set log_timestamp %H:%M:%S).
Irssi is very stable, but you will want to save your configuration once you've gotten everything just the way you want it just in case your system goes down for any reason, especially if you are planning to run Irssi in a shell for a prolonged period of time, as many people prefer to do. Just enter the "/save" command to do so.
Once you've set everything up as you like it, you can connect to KoshkaIRC by entering the command "/connect irc.koshka.love" and then use the /join command to join channels (i.e., /join #, /join #ktv, /join #speakez').
Alternately, you can set up a network configuration which will let you automatically identify with NickServ after registering an account, automatically set user modes, and so forth with the "/network add" command. The basic format for the "/network add" command is "/network add <NetworkName>", although there is a variety of options you can set, and using the command multiple times with the same name will append or merge the configurations instead of adding a new one each time.
You can set Irssi to identify with NickServ automatically by adding the "-autosendcmd" parameter (e.g., "/network add -autosendcmd '^MSG nickserv identify <your-password>' koshkairc") and set it to automatically set certain usermodes with the "-usermode" parameter (e.g., "/network add -usermode +ipwx koshkairc"). Details on all possible options for this command can be found here.
Please note that the /network command won't actually let you connect to anything unless you assign at least one server to the network using the "/server" command. We currently only have one server (irc.koshka.love), so you can assign it to the network using the "/server add -network <NetworkName> <irc.server.domain>" command (e.g., /server add -network koshkairc -tls irc.koshka.love 6697). More details can be found here.
Finally, if you wish, you can add some channels to autojoin using the "/channel" command and have Irssi automatically join you to them when you connect. Just enter "/channel add -auto <#channel> <networkname>" (e.g., "/channel add -auto # koshkairc"), or enter "/addallchans" to add every channel you are currently in.
After this, you can connect directly to the network with your preferred options by simply typing "/connect" followed by the name you assigned the network. Do not forget to save your configuration with the aforementioned "/save" command once you are done!
- Getting started (WeeChat)

- Getting started (Pidgin)
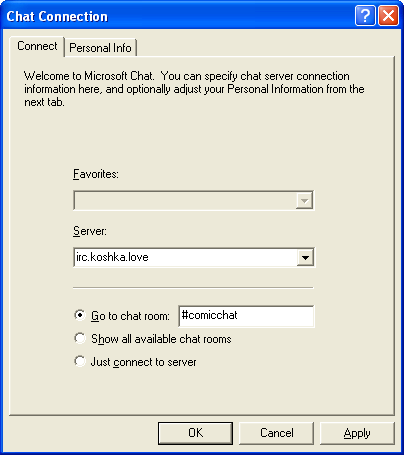
- Getting started (Microsoft Comic Chat) - You can download Microsoft Comic Chat from here (various languages) or here (English). If you are using Linux, please refer to ShadowM00n's excellent guide on installing Comic Chat in WINE. On Windows, the installation should be pretty straightforward.
When first opening Comic Chat, you will be greeted with a prompt where you can select which server to connect to, what channel to auto-join, and what nickname to use. Under server, enter "irc.koshka.love", and next to "Go to chatroom", enter "#comicchat". After this, click on the "Personal Info" tab up top. Next to "Real name", put whatever you want to be shown as your "name" when people /whois you, and next to "Nickname", put the moniker you want to use. When you are done, click on "Apply" to save your settings and either click "OK" to connect to the network, or click "Cancel" to customise more settings.
Depending on what operating system you install on, there may be some settings ticked by default that should not be so. Click on "View" on the top bar and make sure "Comic Strip" and not "Plain Text" is checked off if you want to gain any unique benefit from using Comic Chat. Then go to "View", "Options", and to "Settings". Make sure "Don't Send Microsoft Chat specific information" is not checked off, or your client will not send any information about your character or emotes. Finally, go to the "Comics View" tab and make sure "Automatically download characters you don't have" is checked off, or else you will not be able to see any characters you have not manually downloaded.
The default characters/backgrounds included with Comic Chat are all monochrome and a tad insane, so if none of them are to your liking, you can find a sea of additional ones on Mermeliz's website and on Cidoku's Comic Chat page.
First Steps
Once you are connected to the network, you will want to register your preferred nickname with NickServ. This allows you to make use of services, obtain a custom VHost, be granted permanent access privileges in channels (such as channel operator), register your own channels, and so forth. It also prevents anyone from stealing your nickname.
If you would prefer to use a different nickname than the one you connected with, you can change it at any time by using the /nick command (e.g., /nick newname).
To register your name, you will want to send a private message to NickServ, the service in charge of maintaining nickname registrations and handling various related tasks. To do so, type "/msg nickserv register <password> <E-mail>", where password is your password of choice and E-mail is your E-mail address. It should really go without saying in this day and age, but please do not use the same password as you use for any of your other accounts.
If you choose to use a different nickname later on, you can register it and link it to your original nickname in one go by sending the "group" command to NickServ (/msg nickserv group <original nickname> <password>). Doing this means you will retain your VHost, NickServ settings, and channel access privileges while using your new name and will be able to receive any memos that are sent to the original name, and vice versa.
You will also likely want to register a VHost (Virtual Hostname) for yourself. This will replace the default nonsensical cloak that UnrealIRCd produces to mask your IP address, which people see when they /whois you or when you join a channel (e.g., B7D3ABFA.AB13D796.F7237866.IP) with a unique and personalised one (e.g., comic.cat). Once the VHost is approved by an IRCOp and you activate it via HostServ, it will automatically be enabled whenever you identify with NickServ.
To request a VHost, message HostServ (/msg hostserv request <your-vhost>). You will receive a message from MemoServ when an IRCOp has time to approve it, after which you can enable it through HostServ's "on" command (/msg hostserv on). If you choose to temporarily disable it later, you can similiarly do so with the "off" command (/msg hostserv off).
Joining Channels and Having Private Conversations
Once you have set everything up the way you want it and are ready to chat, you can join a channel(s) of your choosing with the "/join" command (e.g., /join #, /join #speakez). You can see the total list of all existing, non-private channels by using the "/list" command. If you join a channel that does not exist, you will automatically be granted "channel operator" (op) status, after which you can register it using ChanServ.
To initiate a private conversation, you can use the "/query" command (e.g., /query <nickname>) to start a new conversational window without actually sending any information out, or, alternately, using the "/msg" command (e.g., /msg <nickname> <your message>) to open a new conversational window and immediately send off your first message.
If you want to message someone without opening up a new conversational window for either of you, you can use the "/notice" command (e.g., /notice <nickname> <your message>) Obviously, there is nothing stopping them from responding with a regular message, but usage of this command indicates that you are not looking to receive any response. This command can also be used to message an entire channel, although in almost all cases (any channel where the default mode +n is set) you do need to be inside the channel for it to be received.
Please note that while IRCOps are not able to snoop on private conversations or channels they are not in, your ISP or government may still be able to do so. There are a couple precautions that can be taken to ensure your conversations stay private however.
First and foremost, you should always make sure to connect to IRC via SSL (port 6697). While this won't guarantee privacy, it will protect you against man-in-the-middle attacks and hackers sniffing WiFi packets. You can check to see if your conversational partner is using SSL with the /whois command (/whois <nickname>) and making sure you see the verbiage "is using a Secure Connection".
While this only works for private conversations and cannot be deployed in a channel, you can use Off-the-Record Messaging to encrypt conversations with anyone who uses the same client as you. Irssi, WeeChat, HexChat, and Pidgin all have OTR plugins, although they do not work very well with ones for other clients.
Setting User Modes
- D - Blocks anyone who isn't an IRCOp from private messaging you. Individuals who send you a private message will get a single message notifying them that you are unreachable.
- G - Filters swear words, apparently only in private messages despite what the documentation implies.
- i - Hides your presence in a channel if someone outside of the channel attempts to obtain a list of people in it using the "/who" or "/names" commands. This mode is set by default but can be disabled if you choose to do so.
- I - Does not show how long you have been online when someone does a "/whois' command on you.
- p - Does not show what channels you are in when someone does a "/whois" command on you.
- R - Prevents you from receiving private messages from users who are not registered and logged in with NickServ.
- T - Blocks anyone from sending you any CTCPs (i.e., /CTCP version). Helpful if you are wary of someone being able to learn your IRC client or time zone.
- w - Allows you to receive "wallops", a type of global network announcement. This is enabled by default but not very important given we use the "Global" network service for any announcements.
- x - Prevents your IP address/domain name from being shown to others when you join a channel or the "/whois" command is used on you. This is enabled by default and you should not disable it unless you're connecting from a custom domain name and really want others to see it.
- Z - Prevents you from sending or receiving private messages, /notices, or /CTCPs from anyone who is not connected through SSL.
Using Services
As mentioned earlier, services are a group of autonomous bots that handle various administrative functions. You can private message them like regular users and give them commands or ask for help utilising their functions. NickServ handles nickname registration and related functions, HostServ lets you register a custom Virtual Hostname for yourself, ChanServ handles channel registrations and management, MemoServ allows registered users to send private messages to each other that will be received even if a user is not online, and BotServ allows you to deploy a basic bot into any channel(s) that you run.
You can request information on any service's functions by sending them the "help" command (i.e., /msg nickserv help), and request help on a specific function by adding the name of the function after the word "help" (i.e., /msg nickserv help register).
Along with the usual services users expect, KoshkaIRC has a special service bot named Markovka who handles a variety of functions inside any channels she is placed in. Markovka's auto-join list is currently only able to be modified manually, so please let Koshka know if you want her in your channel.
Registering and Operating Your Own Channel
You can register a channel with any name you choose, as long as it is not already taken, your nickname is registered with NickServ, and you are a channel operator in it. You can see if a channel is registered by messaging ChanServ with the "info" command (i.e., /msg chanserv info <channel-name>) or by joining the channel and checking if it is set to mode +r.
If a channel is unregistered, and you have channel operator status (+o) in it (which you will obtain automatically upon enterining any empty and unregistered channel), you can register the channel by using ChanServ's "register" command (i.e., /msg chanserv register <channel-name> <optional description>).
Granting Access Privileges
Once you've set a channel up, you may want to give a friend or two (or three or four or 30) some access privileges to ensure there is consistent coverage, or simply for the heck of it. UnrealIRCd has a whopping five levels of access privilege (please see below), although it is quite rare for all or even most of them to be used in a channel.
You can temporarily grant someone access by manually assigning the relevant mode to them (e.g., /mode +o <nickname>) or, if they have registered their nickname through NickServ, grant them permanent access via ChanServ's access command (e.g., /msg chanserv access <channel-name> add <nickname> <access-level>). This will have ChanServ automatically grant them access whenever they join the channel or login with NickServ. They can later be removed via the access command if needed (e.g., /msg chanserv access <channel-name> del <nickname>).
A user who does not have access privileges through ChanServ will not be able to perform any administrative task that is done through ChanServ.
- Voice - Protects a user from being unable to speak if the channel is muted or their name/hostmask is banned. This mode is temporarily assigned with "/mode +v <nickname>" and permanently assigned with "/msg chanserv access <channel-name> add <nickname> voice". Most IRC clients will display a voiced individual with a "+" sign to the left of their nickname.
- Half-Op - Grants a user the ability to kick regular and voiced users, grant people voice and half-op access, and set some channel modes. This mode is temporarily assigned with "/mode +h <nickname>" and permanently assigned with "/msg chanserv access <channel-name> add <nickname> voice". Most IRC clients will display a half-opped individual with a "%" sign to the left of their nickname.
- Operator - Grants the user the power to perform the overwhelming majority of operator actions in the channel. The only exceptions are that an operator cannot de-register a channel and cannot remove access from or kick an administrator or owner, nor can they grant administrator or owner status to anyone. This mode is temporarily assigned with "/mode +o <nickname>" and permanently assigned with "/msg chanserv access <channel-name> add <nickname> op". Most IRC clients will display an opped individual with a "@" sign to the left of their nickname.
- Administrator - Grants all the privileges of an operator along with the ability to grant and remove administrator access, and kick fellow administrators. The only limits to this level is the inability to de-register a channel and, of course, to grant/remove owner access or kick an owner. This mode is temporarily assigned with "/mode +a <nickname>" and permanently assigned with "/msg chanserv access <channel-name> add <nickname> protect". Most IRC clients will display a administrator individual with a "&" sign to the left of their nickname. Be warned that this mode is relatively new, and its use may make some older clients such as Microsoft Comic Chat unable to display anything said by a user with this mode.
- Owner - Grants absolute access over a channel. An owner can do anything an administrator can do, along with granting and removing owner access, kicking someone with owner status, and de-registering the channel. This mode is temporarily assigned with "/mode +q <nickname>" and permanently assigned with "/msg chanserv access <channel-name> add <nickname> owner". Most IRC clients will display an owner individual with a "~" sign to the left of their nickname. Be warned that this mode is relatively new, and its use may make some older clients such as Microsoft Comic Chat unable to display anything said by a user with this mode.


|
|


 KoshkaIRC


